Racecar Suspension
Yes, I know, I just said that the first goal is safety gear, and the suspension does not fall into this category. Yet we are discussing it before several of the other safety items. The reason for including the suspension this early in the stage is that it will take some time to research, order, and receive it. Once again, talk to other people who are racing the same car as you will be to find out which suspensions work best for your particular vehicle. These conversations will serve as a good starting point. Then you should contact a few suspension vendors. Some vendors will be better than others, supplying you with a significant amount of knowledge and interviewing you as to your needs. It is important that the company knows what you will be using the suspension for. There is a big difference between a general sport suspension and a racing suspension. For a racecar, you will be looking for a suspension that utilizes a coil-over design, regardless of whether the car utilizes struts or shocks. This type of design will allow you to adjust the height of the vehicle on all four sides independently. The coil-over unit incorporates a threaded sleeve that fits over the strut and allows the perch to be adjusted either up or down.
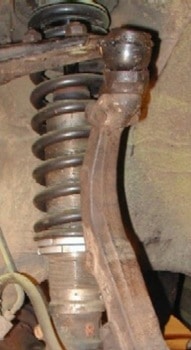 A good company should be asking you what the car is, how much it weighs (state minimum weight plus 20 pounds), and the type of racing you will be doing (i.e., oval versus road racing). In speaking with vendors, discuss whether the strut/shock is multi-adjustable or not. Many units are adjustable so that you can modify its valving to cause it to become either “softer” or “stiffer”. To get a bit more technical with this explanation, it allows adjustment of how the unit collapses (compresses) and extends out (rebounds). If it is adjustable, how many adjustment settings does it have? To very experienced people, having multiple adjustment settings are a good tool to aid them in fine-tuning the suspension. To many others, it only complicates matters. After speaking with several very experienced and reputable individuals within the suspension industry, I decided to purchase non-adjustable units. Their advice of keeping things simple and focusing on my driving, especially in the beginning of my career, really made sense. Even now that I have much more experience, I still like the fact that I don’t have the option of constantly fiddling with various settings. For this reason, it is not a bad idea to purchase either non-adjustable struts/shocks or a unit that only has a few settings. The other advantage is that units that are non-adjustable, or that only have few adjustment capabilities, are typically cheaper than units with many adjustments.
When purchasing your suspension, I would recommend that you purchase the struts/shocks and springs from the same vendor if at all possible. By doing this, you will ensure that the springs you buy mate well with the struts/shocks. The price for suspension systems range greatly, and the sky is the limit. For a good quality suspension system including the struts/shocks and springs, expect to pay between $900 and $1,500. These figures don’t include installation, but it is simple enough to do yourself. Often times the most difficult part of the installation is getting any rusted bolts off the stock suspension. Once you receive the suspension, resist the temptation to install it prior to completing the other safety-related projects. Installing the suspension also requires corner weighting the car, which takes time and access to scales. Maybe even more importantly, prior to corner weighting the car, it is necessary to have the other items completed that will impact the car’s weight distribution. The corner weighting topic will be discussed more in a bit.
Oh, if you can’t afford a decent suspension right away, don’t let this be something that prevents you from building the car or racing. Sure, if you race with a stock suspension, the car won’t be as fast as if it had a race suspension but at least you will be out on the track racing. I raced a little bit using my stock suspension, and I have friends who raced for a few years using their stock suspensions in non-show room stock classes.
A standard rule in racing is to require glass sunroofs to be removed and replaced with a panel or replacement “skin”. The purpose of this is to help avoid broken glass from harming the driver and safety crew, and to reduce the amount of glass that could get onto the track in an accident, especially in a roll-over. One option is to obtain a roof skin from a non-sunroof model of the car and have that installed. This is a complicated process which would take an experienced shop several hours to complete. Another option would be to bring the car to a body shop and have them attempt to weld on a piece of sheet metal, but to do this correctly is also time consuming and challenging, even for a reputable shop. One of the worst aspects of these methods is the associated cost. It could easily become a project that costs you $600 or more.
Another possible solution is to do it yourself using sheet metal. Look for a company that can supply you with a piece of sheet metal cut to the necessary dimensions for your car (slightly larger than the hole it will be covering), or just purchase a piece of sheet metal and cut the new roof skin out yourself. The sheet metal can be riveted to the car roof to cover the sunroof hole. If cutting out the cover yourself, first cut a cardboard template that is approximately 1 ½” larger on all sides than the hole which was created when the sunroof was taken out. You can purchase a piece of sheet metal from a home improvement store or online source. The approximate cost for a 40” x 23” piece of sheet metal that is .063” thick (which is typically thick enough for this purpose) is $45. If you don’t already have a jig saw, it will also be necessary to purchase one that can be used to cut metal. Lay the roof template on top of the piece of sheet metal and trace the outline. Carefully cut the metal, then use a file or sanding pad to remove any sharp edges.
To find a place to purchase custom cut sheet metal, you may need to search a bit, make a few calls, and ask several places in the sheet metal business for referrals. If you are successful in finding a location, their price to supply the sheet metal and cut it to the proper size may be very close to what your cost of purchasing the sheet metal alone would be, saving you time and effort at almost no additional cost.
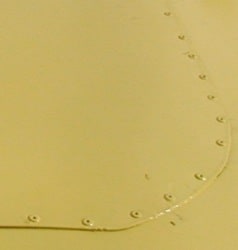 If the shop from which you purchase the sheet metal does not pre-drill the holes for you, or if you decide to make your own roof skin, drill holes approximately every inch along the outside perimeter of it. The size of each hole should be just large enough for the rivets to fit through. I suggest using 1/8” or 3/16” rivets for this job. (A box of 100 rivets can be purchased at any auto parts, home improvement, or tool store for approximately $8 and will usually state the size drill bit that should be used.) Lay the sheet that you cut on top of the roof. To help prevent the middle of the sheet from sagging and the ends from bulging, use something to prop up the middle of the sheet from inside the car such as a wooden board or camera tripod. This piece should lightly push up on the sheet to prevent the inside section from sinking in. Once you have verified that everything will fit nicely, remove the sheet and apply some clear waterproof sealer ( which can be purchased for about $6) on the car roof around the edge of the opening. The purpose of this is to help prevent any water from entering the cockpit when it rains. Place the sheet metal over the covering (the edges should be covering the sealer). Now go get a helper (absolutely anyone can do this) if at all possible. Having someone to assist you with the remaining steps will make the job much easier. Starting from a hole approximately in the middle of the row closest to the rear window, drill a hole through the car roof using the sheet’s pre-drilled hole. Once one hole is drilled, add a rivet. A rivet gun can be purchased for under $15. Verify that the rivet is long enough to hold the sheet in place. Before you get too far, get inside the car to verify that everything looks good (that is, that the rivet is doing its job). Now repeat the same process on the other side of the sheet (the side closest to the windshield). Work your way toward the outsides of the car, alternating sides, and making sure that the metal is as tight as possible. Take your time while completing this process. Once this is done, from inside the car apply some additional waterproof sealer between the new roof area and the existing area. It is normal for the new roof you have installed to have one or two small bulges. Remember that you are doing this yourself to save a significant amount of money.
Racing Seat and Harness
A club-approved racing seat is required for your racecar. A decent new seat that meets club requirements without necessitating a seat back brace can be bought for approximately $250, not including shipping, if purchased from a catalog or via the internet. Although some of the less expensive racing seats may not be as comfortable as more expensive ones, if you are planning to race primarily in sprint races (versus long endurance races), this difference is not very crucial. To make my seat a little bit more comfortable, I bought some basic rubber padding and inserted it into the seat below the fabric. If you look around, you might also be able to buy a nice used seat. But, please, learn from my mistakes! If you find a used seat, make sure that it meets club requirements. Yes, I am going to say it again – refer to your club’s rulebook! I found a great deal on a nice used racing seat. I had the shop that fabricated my cage build seat mounts, and I installed the seat in my car. I later learned that because of the SFI certification the seat had, it also required a seat back brace. Nice. Yet another thing that I needed to have someone custom fabricate!
In addition to the racing seat, you will also need to buy a racing harness (seat belt) that meets the clubs requirements. A 6-point racing harness can be purchased for approximately $80. You will also need to purchase eyebolts and reinforcement mounting plates for the harness sub-strap(s) that cost about $4 each. For the lap belts, use the factory mounting locations and bolts for the lap belts that are very strong and already in place. It will be necessary to drill through the floor of the car to install the harness sub-strap(s). Use the reinforcement plates to ensure that the bolts don’t rip through the floor, in the event of an accident.
![]()
![]()
Site Sponsor